Tuesday, 23 April 2013

Rad decals and Score system - Francis Coding

This week I worked on decals, fixed  some of Jye's code and added in a score system. I actually had a lot of fun with the decals.

--------------------◄|~☼~|►--------------------

I painted up a few dirt decals in Photoshop just to give the walls a bit of variation. The have a high opacity and look like dirt. Because of this I won't post them here. I will post the graffiti decals I did, because I think they turned out pretty rad. These are demos, the in game images have an alpha and lots of opacity.

Click them for full size images.


--------------------◄|~☼~|►--------------------

The high score system took longer than I thought. Mainly because I really struggled with the C# array syntax. I was really hoping there would be a simple function for sorting multidimensional arrays. Something like

multiDimensionalArr.SortBy( 2 ,);

Maybe I haven't been getting enough sleep, but I haven't been able to figure it out. The Unity3D api script reference doesn't seem to have anything helpful and the stuff on the mdsn Visual Studio site doesn't work in Unity. This is just something I'll just have to figure out and I'll probably feel dumb when I do.

While I overcome this bout of poo-brain, I've put in a simpler high-score system using an array which holds names, and an array that holds scores. I wrote an insertion sort function which orders the scores from largest to smallest and moves the names around to match. I just need to start using playerprefs to save scores to the registry and the highscore system will be done.


--------------------◄|~☼~|►--------------------


The latest development is we realized that our game is hella unoptimized and barely runs on the iPad.  Which isn't really surprising considering that none of us have put much thought into optimization or know much about it. Another student passed by and pointed out my draw calls. It's recommended that you have 20 draw calls for an iPad game... we had 80. So that's something we need to look at.

Francis Out.

Tuesday, 16 April 2013

Zombie Health Systems

Francis programming

This week I've managed to implement everything needed for zombie damage. Up until this point zombies have taken one hit and died, now they can take a number of hits depending on where they've been hit and with which weapon. I've just added tagged hit boxes to the zombie prefab seen below.
Instead of the gun script simply deleting any ray cast hit tagged as "zomb" it now calls a health script, placed on each zombie, with the tag of the hit box the ray has passed through.

Hits on the arms, legs or head will decrease the health value of the arm, leg or head hit and the main health pool, while hits on the torso will only decrease the the value of the main health pool. Any health pool being depleted will result in the zombie dying. The individual health pools of the arms legs and head are all smaller than the main health pool, so shooting these is more effective. It also damages the main health just so every hit counts towards the death of the zombie. Each limb has individual health to facilitate the dismemberment mechanic which will hopefully get implemented eventually.


--------------------◄|~☼~|►--------------------


Since last post I have also implemented, different bullet damage for each gun and penetration for one of the guns. Our railgun is now able to hit more than one zombie per shot. An unanticipated benefit of the penetration is that, not only can multiple zombies be hit, but multiple hit boxes in each zombie can be hit. Worst case scenario, this might result in the zombie taking four times the normal bullet damage, to the main health pool, if the ray passes through both arm hit boxes the torso hit box and the head(with each arm and the head subtracting bullet damage from their individual health pools and the main health pool).

I'm not sure this is entirely a bad thing. It certainly shouldn't be hard to program away, but at the same time, if balanced properly it could turn into a cool mechanic. At the very least it merits further discussion.


--------------------◄|~☼~|►--------------------


So that just leaves the score system, balancing and tweaking.

Francis Out

Tuesday, 9 April 2013

GUI and Ammo stuff.

Francis Programming

Since last post I've designed and implemented the GUI and worked on some peripheral gun systems.


--------------------◄|~☼~|►--------------------

For the gui I knew we needed something over the top, gory and kind of dumb. So my first stop for reference images was 90s fighting game huds. Primal Rage stood head and shoulders above the rest by using hearts veins, veins, brains and spinal columns as hud elements. I looked around at some iPhone games as well to see how people had managed the small screen size.

After establishing the elements I needed and my basic layout. I spent a bunch of hours drawing blood splatters. I think it turned out well.


Health - I'm really pleased with how these hearts came out.


Multiplier - Arm, leg and head icons courtesy of Georgina - This will appear when the player consistently hits arms, heads or legs. This will be invisible most of the time. The multiplier system hasn't been made yet so this element doesn't function yet.


Timer - This was the hardest to get right in game, because I've tried to simulate an led screen by putting grey 0s behind the numbers. This means I had to be a lot more precise in lining up the timer text with the timer image. This element will probably get ditched because it's really big.


Score - it's the score.


Weapon - This is the weapon icon and ammo counter. If the weapon doesn't use ammo the ammo counter and the blood splash behind it won't be visible. These weapon icons are temporary. I'll probably post again with those soon.

--------------------◄|~☼~|►--------------------

I also implemented a simple ammo system, fire rate and fixed the weapon select. Different guns have different fire rates, the fire rates of each gun need some tweaking and balancing but that system is in game now. The player can also run out of ammo and gets ammo from killing zombies.

I think we can actually call this a game now. So that's cool.

Francis
out.

Sunday, 24 March 2013

3D, Unity and a Kinect sensor?

The first work I did while the concepts were being drawn was to create a main menu that would later develop into the main build for the game. We discussed options, layout and what functionality we needed within the menu and a basic layout was established. I started by making a scene that we could later develop to form a background for the menu.


I then made a simple GUI script for the menu and created it to the layout that was agreed upon by the group.
From there we for the sake of simplicity added the 3 level options which will be added into the game at a later stage.
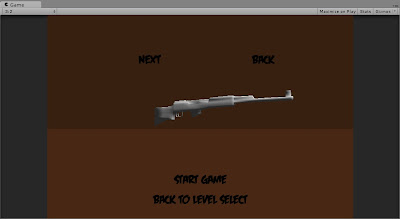
The idea was to keep the menu simple for the prototype and only show the intended layout of the main menu. Once a level was selected the weapon select screen appears and the player can choose which weapon they want. There were only buttons for the prototype as swiping to select weapons will be added at a later stage. The weapons were added later in the prototype and were all modeled by Dylan.
Once the basic menu was done I had concepts for the zombie so I started work on modeling and rigging it.
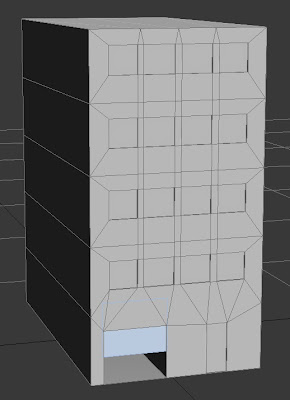
When the zombie model was rigged I created my 3 allocated buildings.
I tried to keep the poly count as low as possible. This meant ignoring the sides of the buildings unseen to the player.
Building 1

Building 4

Building 5
One the buildings were done I unwrapped them, and handed over the files to be textured.
An example of the unwrapped image with notes
I then modeled a school bus for the level background and unwrapped the concept image onto it to get a feel for the style of the game.
I then combined the assets I had created with the other assets from the group and made a build of the game.
The build allowed us to test the AI within the game and get a feel for how it should and can be played.
We used a downloaded zombie as a placeholder until the zombie model was animated.
The spawns are shown in pink while we are testing the zombie movement but will be made invisible later in the development of the game.
I was then asked to instead use a character creation program to make the zombie to allow the zombie animations to be created using a Microsoft Kinect sensor.
The new zombie was created with Autodesk Project Pinocchio.
This character creator allows the blending of two separate models to create your desired character.
I blended a normal man with a skeletal figure to get a more zombie-like character. I then changed the skin and had the new zombie model waiting to be exported.
Once I was ready I exported the character with my desired settings for the project. The program allows different variations to the exported model which was a nice option.
With the model exported to a usable format I downloaded Brekel Kinect and Autodesk Motion builder. I then got my hands on a Kinect sensor and started learning how to use it with Brekel.
My future plans for the week are to integrate the new zombie model and Brekel into Motionbuilder to get some animations for the game.

Saturday, 23 March 2013

Adventures in time and raycasting

Francis Programming

Since last post I've rewritten my AI around the 5 states I mentioned in last post (spawn, walk, proximity, collide, attack) so it's now much more readable and much easier for me (and hopefully anyone else) to fix when things don't work.


--------------------◄|~☼~|►--------------------


I spent a good portion last week trying to figure out why my intelligent direction finding was crashing everything. Eventually I learned that you shouldn't use a WHILE loop in a function called by update, because that can wreck everything. After I figured that out it didn't take long to get that part of the code working as it should.


--------------------◄|~☼~|►--------------------


The next problem I had to code around was the width of my zombie. I had a function dedicated to finding a good direction to move in to avoid obstacles. This worked fine, except for the fact that it relied on raycasting to check if the zombies path was obstructed. So, if the obstacle wasn't directly in front of the zombie the ray would never hit it. This resulted in lots of unintelligent obstacle humping from the zombies. The obvious solution was to add raycast whiskers. Then I just had to figure out how to do that.

Obviously the whiskers had to be one unit away from the central ray on either side (the zombie is one unit wide) so the zombies would allow half a unit when navigating around obstacles. Unfortunately raycasting doesn't operate on local coordinates. So what I assumed would be something simple like:

float xCoord = transform.position.x
Vector3 leftWhisker = new Vector3(xCoord + 1, transform.position.y, transform.position.z)

Vector3 leftWhisker = new Vector3(xCoord - 1, transform.position.y, transform.position.z)
if(Physics.Raycast(leftWhisker, direction, out hit, 4)
{
     Do code in here
}
if(Physics.Raycast(rightWhisker, direction, out hit, 4)
{
     Do code in here
}

, it was much more complicated. After a bunch of time and a bunch of failed attempts, I asked a teacher, Paul for help, and he quickly found the command I needed. Once I had that command which could generate world coordinates from local coordinates I was apples. The finished code looks like this.


Vector3 direction;
Vector3 leftWhisker = new Vector3(-1.0f, 0, 0);
Vector3 rightWhisker = new Vector3(1.0f, 0, 0);
Vector3 worldWhisker;
RaycastHit hit;

...


worldWhisker = transform.TransformPoint(leftWhisker);

if(Physics.Raycast(worldWhisker, direction, out hit, 4) || task == "collide")
{
if(hit.transform.tag != "zomb")
{
directionFound = false;
leftHit = hit.distance;
}
}

worldWhisker = transform.TransformPoint(rightWhisker);

if(Physics.Raycast(worldWhisker, direction, out hit, 4) || task == "collide")
{
if(hit.transform.tag != "zomb")
{
directionFound = false;
rightHit = hit.distance;
}
}

Using that code I created a system by which the zombie can intelligently pick a new direction based on whether the obstacle was further away from the right or the left whisker.

--------------------◄|~☼~|►--------------------

For the sake of consistency I recoded the zombie ai and spawn scripts to operate on a timer rather than a series of different counters. This means that the zombies will act the same way on any system in any conditions, independent of frame rates. The zombies controlled by the old code would moved faster on a machine with a better processor and slower when there were lots of zombies on screen.


--------------------◄|~☼~|►--------------------

I also fixed some minor bugs (as in bug that weren't caused by huge errors in my logic, and were easy to fix once found). So, for better or worse, zombies will no longer fly into the air if they bump another zombie too hard and they no-longer lazily turn when they should be going forward (these bugs fixed courtesy of rigidbody, freeze position and rotation in the inspector). Zombies will no longer walk into an obstacle walk straight back the walk into the obstacle again without turning, repeating indefinitely.

--------------------◄|~☼~|►--------------------


The zombies now consistently avoid obstacles and rarely get stuck on things. They adopt a variable from the spawner which tells them to walk in a straight line for a period of time, so they can spawn in awkward spots. There is nothing else the ai needs, so unless I've missed something or something new comes up, the ai is done. The only work it will need from now is fixing any unexpected behaviours and a little polish.

On to key game systems I guess.
Francis.

Tuesday, 19 March 2013

Jye 13/3/2013

i have created two tilable textures for Georgina, a road texture and a concrete texture.

Jye 14/3/2013

i have been tasked with creating a variable called Penetration which will send out a ray that will only stop when it reachs the end of the scene and enemy zombies caught in the ray are destroyed.

Jye 19/03/2013

i spent the day trying to figure out the part of the gun script responsible for the penetration factor of the rail gun. i tried working with this script:

  1. hits = Physics.RaycastAll (cam.position, cam.forward, 100.0);
  2. for (var i = 0;i < hits.Length; i++) {
  3. //var hit = hits[i];
  4. hits[i].collider.SendMessage("ApplyDamage", (damage/(i+1)), SendMessageOptions.DontRequireReceiver);
  5. sparks.rotation = Quaternion.FromToRotation(Vector3.up, hits[i].normal);
  6. Instantiate(sparks, hits[i].point, sparks.rotation);
  7. if(hits[i].rigidbody){
  8. hits[i].rigidbody.AddForceAtPosition(cam.forward*(force/(i+1)), hits[i].point);
  9. }

but there were too many errors, so i halted work on the penertration and constructed the ammo counter constraint for the guns.

Tuesday, 12 March 2013

Concept dump


Basic male Zombie concept


First draft of city level.


Re-draw of the city level due to the camera angle not giving us a big enough playing field.

Concept of the highway level.
Loosely based on a promotional poster for the Walking Dead(c) Tv series


Loose concept for the barn level.


Programming so far


Week one:
Tuesday 19 ► After our group discussion about how the game should work, I built a quick modular rig in unity. That rig included a main camera with a shooting script (using raycasting on click), a spawner prefab and a makeshift zombie (a cube) with the beginnings of an AI script (which causes the cube to moves towards the camera). The rig allowed you to place spawners, which would spew cubes, at regular intervals (spawn rate and spawn delay could be adjusted from unity). The cubes moved towards the camera at a slow pace and would disappear when shot.

I felt that building in simple path finding early on would allow for easier experimentation of spawner placement around an environment later in development. So I started on a collision system by which the cubes could avoid tagged obstacles (tagged “obstacle”). This was a script placed on a trigger sphere around the cube. At the end of day one this functioned at a basic level turning 45° to the left when an object was encountered (and moving in that direction for a set number of frames). This broke the shooting mechanic temporarily.

Wednesday 20► Started work on more in-depth pseudocode. I made a good start with a list of functions that would need to be covered by the final code. Then I got bogged down writing pseudocode for menus. By the end of the day I had come to the conclusion that this was a pointless exercise as well as being super boring. Later that night I started writing pseudocode which just covered gameplay functions.

Thursday 21► Finished writing the pseudocode which should provide a decent map of the code that needs to be written. Found the one box that needed to be ticked to allow raycasting to pass through triggers.

I also got the obstacle avoiding part of the AI working. Instead of just turning 45° as it approached an obstacle it generated a random number between -90 and 90 and changes the direction the cube faces and travels based on that.

Tuesday 26► Changed the part of the AI which made the cubes avoid obstacles to turn over several frames rather than just one.
Started writing code to deal with the cubes actually hitting an obstacle. Initially I experimented with using the same code which made the cube turn before hitting an obstacle. This worked ok, but it looked wrong for the cubes to turn as they were moving backwards. I then messed with a system which would cause the cube to move straight back and then execute the code for avoiding obstacles.

That system worked fine except that when there were multiple cubes in the same area they would grind against each other and break everything.

Example Scenario:
Cube 1 approaches obstacle. Makes a 20° course correction but still hits the obstacle, pretty much, head on.
Cube 2 approaches and makes a similarly small course correction.
It hits cube 1 as it reverses and keeps moving forward.
Both cubes can remain stuck on that obstacle indefinitely and cause more cubes to pile up.

As my first attempt to fix this problem, I modified the section of code that dealt with obstacle collisions, and made it check for objects tagged “zombie”. This was functionally ok. It fixed the problem, but it created some strange behaviour. The cubes would brush against each other and immediately reverse and change course. Even worse was that cubes hit from behind would reverse back with the cubes that had hit them.

So, I started fiddling with collision.relativeVelocity. It took a while but eventually figured it out. By making sure that collision.relativeVelocity.z was a positive number before accepting a collision I was able to eliminate most awkward collisions and even allow cubes to grind against each other a bit.

At the suggestion of my teacher Justin, I downloaded and implemented a free third-party animated zombie as a placeholder asset (complete with walk cycle)

Thursday 28► To fix everything broken by adding the zombie model I reverted to my original zombie cube prefab, turned off the mesh renderer on the cube and made it as tall as the zombie model. Then I added the zombie model on top of that.


By this point my zombie AI had gotten super messy so I wrote some, more in-depth, pseudocode and started rewriting the script around the five tasks the zombie needed to perform. These tasks were
Spawning: For the purpose of spawning zombies off screen and behind objects, zombies need to travel in a straight line for a period of time before they make for the camera.
Walking: Most of the time all the zombies need to do is walk towards the camera.
Avoiding obstacles: If a zombie is near an obstacle it can change course to avoid walking into it.
Hitting obstacle: After hitting an obstacle a zombie needs to move away from it and pick a new course.
Attacking player: The Zombie needs to attack the player if it gets close enough.


Francis

Wednesday, 6 March 2013

Art inspiration

The art style for this game is based on a comic look, similar to styles used by Titmouse Studios, Grasshopper Manufacturer and other such companies.

The original idea I had was a very 2D cartoon design, however this will no longer work.
We, instead, have chosen to make a more 3D style game as we feel it will better suit the game we are going for. the cartoon or rather, comic style is still present and we hope that it carries across to the final project the way we hope.

Welcome

This is the progress blog for an up and coming Zombie survival game for the IOS, currently in development by Sleep Experiment Studios.
This blog will be updated on a regular basis so please keep checking for new work.

Our team consists of:

Georgina - Art Director, Concept Artist and Blog manager

Max - 3D Modeler and Build Manager

Francis - Code

Jye - Code and documentation

Dylan - 3D modeler and Animator

James - Code, 3D Modeling and Animation.